
I love the reclining desk that I built a few years ago. It has made an enormous difference in relieving back pain and tension in my neck and shoulders that comes from spending lots of hours at a computer.
But it has some design flaws. It's pretty big, and kind of cumbersome to use, and it took just a little too much time to get in and out of. What I really wanted was the comfort of a reclining desk with the convenience and compactness of a conventional desk.
In this post, I detail the design and build process that led to my latest DIY reclining desk (V3). I had a few simple design goals:
- Easy to use (e.g. getting in and out quickly, minimal adjustments needed to use, etc.)
- Compact size
- Fewer materials (and thus less expensive)
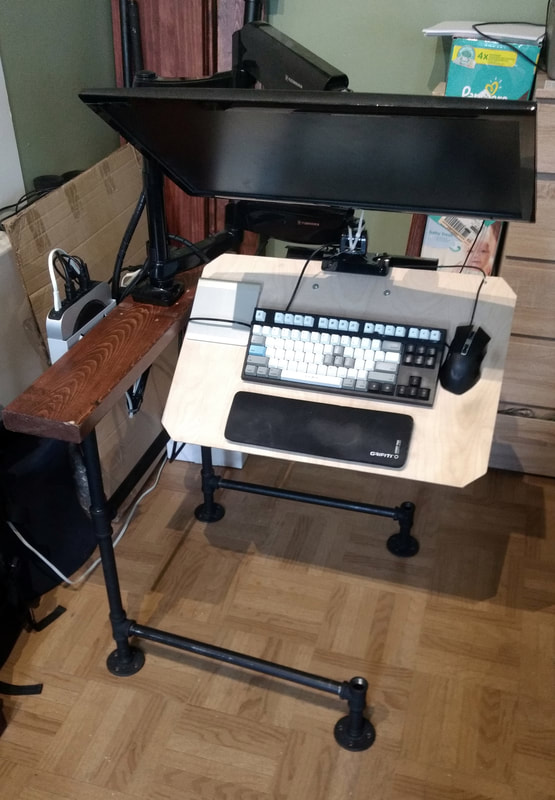
The frame is built out of 3/4" black steel piping, 6 pipe tees, 6 pipe flanges, and a single piece of 2x6 wood. The frame supports a dual arm monitor mount that I repurposed into holding a monitor and custom made keyboard tray that each swing into position after sitting in the reclining chair. The desk legs are low enough to go underneath the reclining chair but provide plenty of support for the frame. The use of black piping not only reduces the amount of hardware but also adds weight to the frame, which helps keep everything stable when swinging the monitor and keyboard tray back and forth.
This design largely achieved my goals. Having both the monitor and keyboard mounted to the left of the chair makes it very easy and fast to get into the chair and likewise very simple to move the monitor and keyboard into position for use. The form factor is quite compact, and it can work with a number of different types of reclining chairs (though I still really like the simple and affordable zero gravity chair). Finally, the bill of materials is quite modest. Compared to my previous version (V2), this design achieves a 760% reduction in the amount of 2x6 wood used (from 220" to 29") and a 176% reduction in the amount of steel piping used (from 185" to 105").
This design largely achieved my goals. Having both the monitor and keyboard mounted to the left of the chair makes it very easy and fast to get into the chair and likewise very simple to move the monitor and keyboard into position for use. The form factor is quite compact, and it can work with a number of different types of reclining chairs (though I still really like the simple and affordable zero gravity chair). Finally, the bill of materials is quite modest. Compared to my previous version (V2), this design achieves a 760% reduction in the amount of 2x6 wood used (from 220" to 29") and a 176% reduction in the amount of steel piping used (from 185" to 105").
How I Built It
STEP 1: Build The Frame
Perhaps the best aspect of this desk is just how easy it is to build. I started by first assembling the pipe frame and then mounting the piece of wood to the frame. Start by first making the "H" shaped frame shown in the photos, then mount the piece of wood using 8 wood screws and two flanges, and finally add the two pipe leg extensions to the frame.

Simple schematic of the V3 frame.
<Side Note About Frame Design>
In my first prototype of this frame I made a critical error. Originally I tried to use a single piece of pipe to extend the frame legs so that they would sit off to the right of the reclining chair (left photo), that way all you add to do to adjust the desk to a different chair was change the length of the center pipe. Unfortunately, this design creates two rotation points about which the whole monitor mount can come crashing down on you! Fortunately the flanges on the floor created enough resistance to prevent a crash in my case, but the realization forced me to redesign the frame into it's current (and much more stable) form (right photo).
In my first prototype of this frame I made a critical error. Originally I tried to use a single piece of pipe to extend the frame legs so that they would sit off to the right of the reclining chair (left photo), that way all you add to do to adjust the desk to a different chair was change the length of the center pipe. Unfortunately, this design creates two rotation points about which the whole monitor mount can come crashing down on you! Fortunately the flanges on the floor created enough resistance to prevent a crash in my case, but the realization forced me to redesign the frame into it's current (and much more stable) form (right photo).
 Bad Frame | 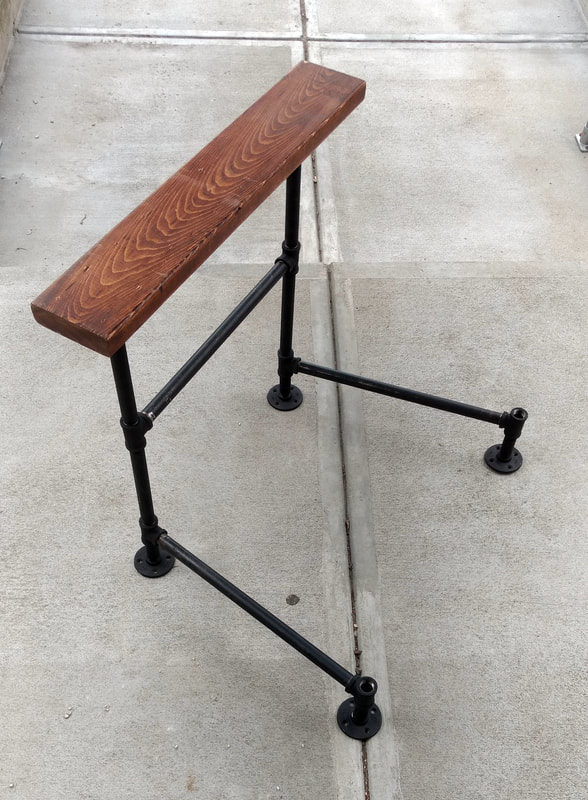 Good Frame |
STEP 2: Attach Stuff To The Frame
After assembling the frame, I drilled a large hole in the top of the wood to mount the dual arm monitor mount. I also attached a powerstrip and mac mini mount to the left side of the wood.
STEP 3: Build And Attach Keyboard Tray
I cut the keyboard tray out of some thin wood from Home Depot. I forgot which type, but it's a balance between thin enough to be light but stiff enough to support the keyboard without bending. The dual arm monitor mount came with a tray for holding a laptop, so I repurposed it for mounting the keyboard tray. After attaching it, I had to add a zip tie to keep the whole thing from tipping down too far. There was just too much weight on the monitor mount, so the zip tie held it all at the right angle. Finally, to keep the keyboard itself in place, I used a few more zip ties and cut holes in the tray so that it wouldn't slide around when I swiveled the arm around. With the keyboard tray attached, I could swivel the monitor and keyboard independently.
Wrap up
The only remaining component I didn't describe yet is the chair. I used the same, cheap reclining chair that I used in my previous (V2) desk. It just slides right in over top of the desk frame legs. The monitor and keyboard can swivel out of the way to get in and out of the desk.
Overall I'm much happier with this design over the previous one. I no longer have to use clamps to hold the keyboard tray in place, and it is far easier to get in and out of. It's also a much more flexible design that could be used with a wide variety of recliners.
Overall I'm much happier with this design over the previous one. I no longer have to use clamps to hold the keyboard tray in place, and it is far easier to get in and out of. It's also a much more flexible design that could be used with a wide variety of recliners.
 RSS Feed
